Xilinx ZCU102
Contents
Xilinx ZCU102 Board Setup
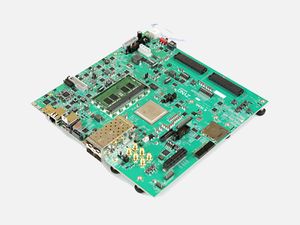
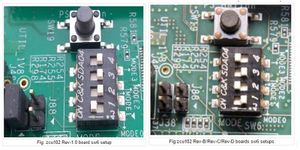
Zynq UltraScale+™ MPSoC device has a quad-core ARM® Cortex-A53, dual-core Cortex-R5 real-time processors, and a Mali-400 MP2 graphics processing unit based on Xilinx's 16nm FinFET+ programmable logic fabric. The Xilinx ZCU102 supports all major peripherals and interfaces enabling development for a wide range of applications. The boot image can be put into Flash or SD card and in this tutorial we describe the steps for booting from SD card. The board configuration has to be switch for SD boot as shown in the following picture (for more details please refer to the section "ZCU102 board setup " of the Xilinx manual).
Prebuilded SD images can be found in the Xilinx repository and the SD card setup can be performed as follows:
- Download and extract the image available here: https://www.xilinx.com/member/forms/download/xef.html?filename=Ubuntu_Desktop_Release_2018_3_1.zip
- Mount the SD card on your host machine.
- Flash the downloaded image into the SD card:
$ sudo dd if=Ubuntu_Desktop_Release_2018_3/Ready_to_test_images/ZCU102_UbuntuDesktop_2018_3.img of=/dev/sdb bs=4M status=progress && sync
The SD card will contain two partitions:
- the first partition, referred to as ROOT, contains the boot images (i.e., BOOT.BIN and uImage.ub).
- the second partition, referred to as ROOT1, stores the system root filesystem.
Compilation tools setup
Xilinx provides the tools in order to customize, build and deploy embedded Linux solutions on Xilinx processing systems. Such tools consists a set of pre-configured binary bootable images, fully customizable Linux for the Xilinx devices, and PetaLinux/Xilinx Vivado SDK. The Xilinx Vivado (with SDK) is used to define the hardware design of the related board, whereas the PetaLinux SDK includes tools and utilities to automate complex tasks across configuration, build, and deployment. The PetaLinux tools aim to configure, build and deploy a booting image for the Xilinx board on the basis of the hardware design file (HDF) or Board Support Packages (BSP).
In this tutorial we use Petalinux tool to configure, build and package the Linux kernel for the ZCU102 board, whereas we use GNU Arm Embedded Toolchain, that includes the GNU Compiler (GCC) for aarch64, to compile either the Jailhouse hypervisor and the ERIKAv3 inmate.
PetaLinux setup
Download the Petalinux 2019.1 installer from https://www.xilinx.com/support/download/index.html/content/xilinx/en/downloadNav/embedded-design-tools.html.
PetaLinux requires a number of standard development tools and libraries to be installed on the host workstation. Install the libraries and tools listed in the Petalinux tool reference guide. It follows the commands used to install a subset of the Petalinux 2019.1 dependencies.
$ sudo apt install bash zlib1g:i386 gcc-multilib socat chrpath
$ sudo apt install autoconf libtool-bin texinfo zlib1g-dev
$ sudo unlink /bin/sh
$ sudo ln -s /bin/bash /bin/sh
PetaLinux installation is very straight-forward. Without any options, PetaLinux tools will be installed into a subdirectory of the current working directory. Alternatively, an installation path may be specified.
Example of PetaLinux tools 2019.1 installation in the /opt/petalinux directory:
$ sudo mkdir -p /opt/petalinux
$ sudo chown <user>:<user> /opt/petalinux
$ chmod +x petalinux-v2019.1-final-installer.run
$ ./petalinux-v2019.1-final-installer.run /opt/petalinux
Setup of the GNU Compiler for aarch64
Download the GNU Arm Embedded Toolchain that includes the GNU Compiler (GCC) for aarch64. More in detail, download the gcc-arm-8.2-2019.01-x86_64-aarch64-linux-gnu archive
and unzip the downloaded file.
In the following part of the tutorial, we refers to the folder containing the binary files for cross-compiling as <path for the aarch64 cross-compiler> (i.e.,gcc-arm-8.2-2019.01-x86_64-aarch64-linux-gnu/bin).
Linux kernel build for Jailhouse
Since Jailhouse compilation requires a copy of the compiled Linux kernel with all object files, we give an overview on how to build the kernel and the boot image. The main steps to build a kernel for the referred board using Petalinux 2019.1 are the following:
- Create a Petalinux project.
- Configure the kernel and DTS
- Build and install the kernel, the boot image and the modules
Petalinux project
Setup the PetaLinux working environment by sourcing the appropriate settings script:
$ source /opt/petalinux/settings.sh
Download the Board Support Packages (BSP) for Petalinux 2019.1 xilinx-zcu102-v2019.1-final.bsp.
Create a PetaLinux project for the referred BSP:
$ petalinux-create -t project -s <path to the bsp>/xilinx-zcu102-v2019.1-final.bsp
$ cd xilinx-zcu102-2019.1
Launch the top system configuration menu by running the following command:
$ petalinux-config
Enable the SD boot `Root filesystem type (SD card)`
CONFIG_SUBSYSTEM_ROOTFS_SD := Image Packaging Configuration--->Root filesystem type-->SD card
Configure Linux
In order to run Jailhouse module, the Linux kernel needs to be configured as follows. Launch the kernel configuration menu by running the following command:
$ petalinux-config -c kernel
Include all symbols in kallsyms:
CONFIG_KALLSYMS_ALL := General setup --> Configure standard kernel features (expert users) --> Load all symbols for debugging/ksymoops --> Include all symbols in kallsyms
Enable the Device Tree overlays:
CONFIG_OF_OVERLAY := Device Drivers --> Device Tree and Open Firmware support (OF [=y]) --> Device Tree overlays
Linux device tree
The ZCU102 second UART is typically used by the no-root Jailhouse inmate. The second UART can show nothing due to a problem between the DTB and Jailhouse. In order to fix that, apply the following patch to the Petalinux YOCTO system user DTS.
 --- a/project-spec/meta-user/recipes-bsp/device-tree/files/system-user.dtsi
 +++ b/project-spec/meta-user/recipes-bsp/device-tree/files/system-user.dtsi

  /include/ "system-conf.dtsi"
  /{
 +        amba {
 +                serial@ff010000 {
 +                        status = "disabled";
 +                };
 +        };
 +
 +        aliases {
 +                /delete-property/ serial1;
 +        };
  };
 +/delete-node/ &uart1;
 +/delete-node/ &pinctrl_uart1_default;
 +
  &i2c1 {

	/* FIXME PL i2c via PCA9306 - u45 */
Build the kernel
Build:
$ petalinux-build
Create the boot image:
$ petalinux-package --boot --fsbl images/linux/zynqmp_fsbl.elf --u-boot images/linux/u-boot.elf --force
Note that the built images BOOT.BIN and uImage.ub are saved in <petalinux-project-root>/images/linux.
Install boot images and modules
Modify the prebuilt Ubuntu image (i.e., ZCU102_UbuntuDesktop_2018_3.img) flashed into the SD card, by overwriting image.ub and BOOT.BIN contained in the boot partition, as follows:
$ cp -v images/linux/BOOT.BIN images/linux/image.ub <ROOT>
Install the kernel modules on the SD root file-system:
$ sudo cp -av build/tmp/work/zcu102_zynqmp-xilinx-linux/linux-xlnx/4.19-xilinx-v2019.1+gitAUTOINC+9811303824-r0/image/lib/* <ROOT1>/lib/
Jailhouse hypervisor
For jailhouse on Xilinx ZCU102, we refer to Jailhouse v0.12 on the GitHub repository. The commands to checkout at such version are the following:
$ git clone https://github.com/siemens/jailhouse.git
$ cd jailhouse
$ git checkout v0.12 -b jailhouse_xilinx
Create the configuration file for the ZCU102 board ci/jailhouse-config-xilinx-zcu102.h). The content of such configuration file is the following:
#define CONFIG_TRACE_ERROR             1
#define CONFIG_ARM_GIC_V2              1
#define CONFIG_MACH_ZYNQMP_ZCU102      1
Copy the configuration file into <jailhouse directory>/include/jailhouse/config.h
$ cp ci/jailhouse-config-xilinx-zcu102.h include/jailhouse/config.h
Jailhouse compilation requires a copy of the compiled Linux kernel with all object files. We refer to the path of such folder as <path to compiled kernel> that is typically stored in the petalinux project (e.g., <petalinux project>/build/tmp/work/zcu102_zynqmp-xilinx-linux/linux-xlnx/4.19-xilinx-v2019.1+gitAUTOINC+9811303824-r0/linux-zcu102_zynqmp-standard-build/). Furthermore, we refer to the path of the folder containing the binary for cross-compilation as <path or the aarch64 cross-compiler>.
Build jailhouse:
$ make ARCH=arm64 CROSS_COMPILE=<path or the aarch64 cross-compiler>/aarch64-linux-gnu- KDIR=<path to compiled kernel>
Install jailhouse on the SD card:
$ sudo make ARCH=arm64 CROSS_COMPILE=<path or the aarch64 cross-compiler>/aarch64-linux-gnu- KDIR=<path to compiled kernel> DESTDIR=<ROOT1> install
Copy the zcu102 root cell and in-mate demo cell on the SD card file-system.
$ cp configs/arm64/zynqmp-zcu102.cell configs/arm64/zynqmp-zcu102-inmate-demo.cell <ROOT1>
Build ERIKAv3 for Jailhouse
The main steps to create and build ERIKA v3 jailhouse inmate are the following:
- download and install RT_DRUID that includes ERIKA v3 as Eclipse plugin.
- create and build a new RT-Druid v3 Oil and C/C++ project containing the main application running on ERIKA v3 (i.e., source files and the oil file containing the configuration for the referred board)
- install the generated binaries into the board
Setup ERIKAv3 RT-Druid
Download the RT-Druid archive from ERIKAv3 download web page and more specifically the GH65 release.
Notice that to download RT-Druid, you have to accept the RT-Druid and the ERIKAv3 licenses. The ERIKAv3 license is a GPLv2, whereas the RT-Druid license is a proprietary license that allows you to use the provided version of RT-Druid at no cost.
RT-Druid requires Java Standard Edition version 8, or newer.
RT-Druid is provided as a compressed archive, which can be unpacked in your user directories. RT-Druid has ERIKAv3 source code as Eclipse plugin and the default path is <RT-Druid folder>eclipse/plugins/com.eu.evidence.ee3_3.0.1.20190524_gh65/ee_files. However, it is possible to change the RT-Druid configuration in order to refer to another ERIKAv3 source code. For more details about RT-Druid configuration, see the RT-Druid configuration wiki page.
Unzip the downloaded archives. Since the referred RT-Druid release (e.g., GH65) manages a previous version of Jailhouse, apply the following patch:
 --- a/eclipse/plugins/com.eu.evidence.ee3_3.0.1.20190524_gh65/ee_files/pkg/arch/aarch64/jailhouse/ee_arch_compiler_gcc.mk
 +++ b/eclipse/plugins/com.eu.evidence.ee3_3.0.1.20190524_gh65/ee_files/pkg/arch/aarch64/jailhouse/ee_arch_compiler_gcc.mk
 @@ -83,7 +83,8 @@ endif
  INCLUDE_PATH += $(JAILHOUSE_DIR)/hypervisor/arch/arm-common/include
  INCLUDE_PATH += $(JAILHOUSE_DIR)/inmates/lib/arm64/include
  INCLUDE_PATH += $(JAILHOUSE_DIR)/inmates/lib/arm-common/include
 -
 +INCLUDE_PATH += $(JAILHOUSE_DIR)/inmates/lib
 +INCLUDE_PATH += $(JAILHOUSE_DIR)/inmates/lib/include

  JAILHOUSE_AARCH64_GCCPREFIX ?=
Before starting RT-Druid, setup the environment by exporting the variables JAILHOUSE_DIR and JAILHOUSE_AARCH64_GCCPREFIX as follows:
$ export JAILHOUSE_DIR=<path of the jailhouse directory>
$ export JAILHOUSE_AARCH64_GCCPREFIX=<path or the aarch64 cross-compiler>/aarch64-linux-gnu-
where <path of the jailhouse directory> is the folder containing Jaihlouse and <path or the aarch64 cross-compiler> is the path of the folder containing the binary for cross-compilation.
Furthermore since we refer to Jailhouse v0.12 for Xilinx ZCU102, set the environment variable JAILHOUSE_VERSION as follows:
$ export JAILHOUSE_VERSION=0.12
Launch eclipse application located into the eclipse folder extracted from the RT-Druid Package.
$ ./eclipse &
Hello world example
As for example, we create a simple "helloworld" application consisting of two tasks printing on the serial interface.
- Create a new project by clicking on
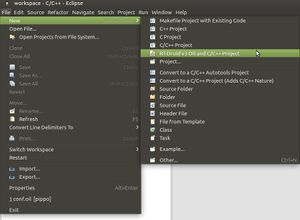
New→RT-Druid v3 Oil and C/C++ Projectas shown in the next Figure: - In the RT-Druid C/C++ Project Wizard name the new project (e.g.,
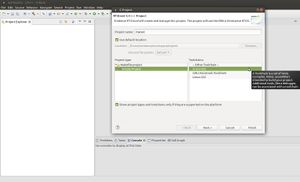
mytest) and select the Cross-GCC as shown in the next Figure: - Check the box for using an existing template and select
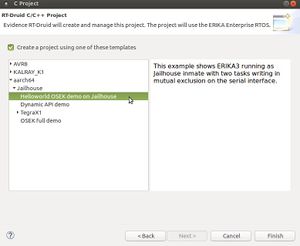
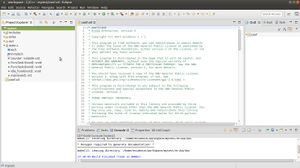
aarch64→Jailhouse→Helloworld OSEK demo on Jailhouseas shown in the next Figure: - Eclipse will then show the new project, and RT-Druid will generate the configuration files, as shown in the next Figure:
- Modify the
conf.oilfile as follows:
line 69: /* SOC_DATA = NVIDIA_TEGRA_X1; */
line 70: SOC_DATA = XILINX_ZYNQ_ULTRASCALE_PLUS;
To build an RT-Druid Project, right-click on your project, as example mytest, shown in the Eclipse Project Explorer panel, and then click on Build Project context-menu entry. The compilation process will generate the following directories:
- erika - It stores all the files related to ERIKAv3
- out - It stores all the files related to the application, included the final binaries
In particular, the out directory will contain the following files:
- applSignature.oil - the application OIL signature, which is basically the OIL file re-exported by the tool
- ee_applcfg. - the application configuration generated by RT-Druid
- makefile - the main application makefile
- erika_inmate.bin/elf - the ERIKAv3 binary containing the application
Copy the ERIKAv3 binary on the SD card file-system.
$ cp <RT-Druid workspace>/mytest/out/erika_inmate.bin <ROOT1>
Run ERIKAv3 as Jailhouse inmate
The hypervisor requires a contiguous piece of RAM for itself and each additional cell. This currently has to be pre-allocated during boot-up. On ARM platforms this is usually achieved by reducing the amount of memory seen by the Linux kernel.
Board boot
Setup the serial terminal connected to /dev/ttyUSB0 for primary UART (Linux) with baud rate 115200. At the board start, modify the kernel boot arguments by stopping the execution at the u-boot prompt (typically by pressing any key at the boot) as follows:
ZynqMP> setenv bootargs "earlycon clk_ignore_unused console=ttyPS0,115200 mem=1536M root=/dev/mmcblk0p2 rw rootwait"
ZynqMP> setenv uenvcmd "fatload mmc 0 0x3000000 Image && fatload mmc 0 0x2A00000 system.dtb && booti 0x3000000 - 0x2A00000"
Save the new environment variables for the next reboots and then continue the booting:
ZynqMP> saveenv
ZynqMP> boot
Running Jailhouse and ERIKAv3
Once Linux is running, update the list of module dependencies:
# depmod -a
Insert jailhouse.ko kernel module:
# modprobe jailhouse
Enable jailhouse by specifing the zcu102 root cell path:
# jailhouse enable /zynqmp-zcu102.cell
Create the jailhouse cell:
# jailhouse cell create /zynqmp-zcu102-inmate-demo.cell
Load the ERIKAv3 binary:
# jailhouse cell load inmate-demo /erika_inmate.bin
Start ERIKAv3:
# jailhouse cell start inmate-demo
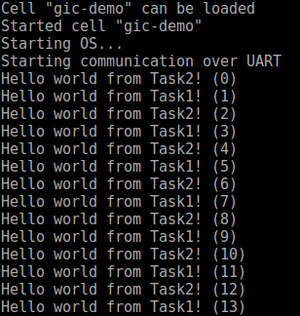
Setup the serial terminal connected to /dev/ttyUSB1 for secondary UART (Jailhouse no-root cell) with baud rate 115200. Second UART will show the following output:
Notes on ERIKAv3
Libc support
In case the application running on ERIKAv3 needs to use services provided by the libc library (e.g. memcpy()),
please refer to
the "Libc support" section on the wiki page about Jailhouse
for building the Jailhouse inmate library (and also ERIKAv3) using a bare-metal toolchain.
Current release
In this tutorial we refers to the latest ERIKAv3 release available (i.e., ERIKAv3 download web page and more specifically the GH65). It is worthwhile to notice that this release does NOT support the generation of Software Generated Interrupts (SGIs) on the aarch64 platform yet.
