Difference between revisions of "Bare-metal x86-64 image"
| Line 1: | Line 1: | ||
| − | This page spiecifies how to create a bare-metal | + | This page spiecifies how to create a bare-metal ERIKA3 RTOS image for x86-64. The following image can be used for running on Qemu or with Xen/KVM hypervisor. |
| + | |||
| + | This tutorial explains how to setup RT_Druid environment to compile ERIKA3 RTOS application and how to create an ERIKA3 bare-metal image running a simple application. | ||
| + | |||
| + | == Bare-metal compiler set-up == | ||
| + | [todo] | ||
| + | |||
| + | == RT-Druid set-up == | ||
| + | In order to RT-Druid on the platform, download the RT-Druid package from [http://www.erika-enterprise.com/index.php/download/erika-v3-download.html the download section] of the ERIKA3 website. Then, extract the downloaded archive. In the following part of the tutorial, we refer to directory containing the extracted RT-Druid archive as <code>$RTDRUID_DIR</code>. | ||
| + | |||
| + | Launch the RT-Druid application as follows: | ||
| + | $ cd $RTDRUID_DIR | ||
| + | $ ./eclipse | ||
| + | |||
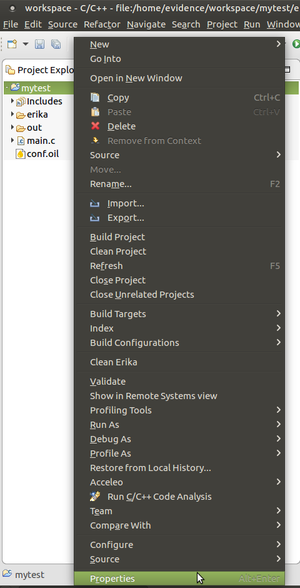
| + | In order to enable the bare-metal compiler tool, set the <code>Gnu compiler prefix</code> property. RT-Druid allows to set these variables also from within Eclipse. Just press the right mouse button on the Eclipse project and select Properties as shown in the following figure. | ||
| + | [[File:Eclipse_project_properties.png|thumb|center|Figure 1: Eclipse project properties.]] | ||
| + | |||
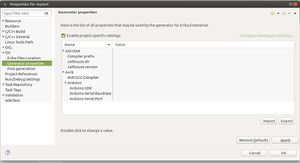
| + | Then, select Generator properties, enable project specific settings (as shown in the next figure), and set the desired value for the X86_64 property named <code>Gnu compiler prefix</code>. | ||
| + | [[File:Generator_properties.jpg|thumb|center|Figure 2: Generator properties.]] | ||
| + | |||
| + | Note that RT-Druid allows to set these variables for a single project by just pressing the right mouse button on the Eclipse project and selecting Properties). | ||
| + | |||
| + | == Simple application == | ||
| + | As ERIKA3 application we consider the simple "helloworld" application consisting of two tasks printing on the serial interface. | ||
| + | <ol> | ||
| + | <li> Run the RT-Druid tool | ||
| + | $ cd $RTDRUID_DIR | ||
| + | $ ./eclipse | ||
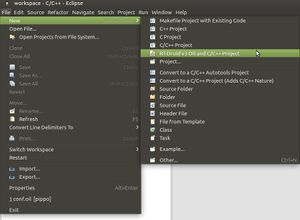
| + | <li> Create a new project by clicking on <code>New</code> → <code>RT-Druid v3 Oil and C/C++ Project</code> as shown in the next Figure: | ||
| + | [[File:Eclipse_new_project1.jpg|thumb|center|Figure 3: Create a new RT-Druid project.]] | ||
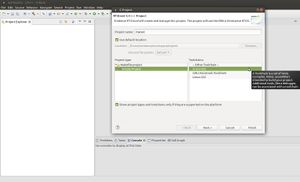
| + | <li> Name the new project (e.g., <code>mytest</code>) as shown in the next Figure: | ||
| + | [[File:Eclipse_new_project2.jpg|thumb|center|Figure 4: Naming the new RT-Druid project.]] | ||
| + | <li> Check the box for using an existing template and select <code>x86-64</code> → <code>Helloworld OSEK demo</code>as shown in the next Figure: | ||
| + | [[File:Helloworld_template_x86.jpg|thumb|center|Figure 5: Selecting the Helloworld template.]] | ||
| + | <li> Eclipse will then show the new project, and RT-Druid will generate the configuration files, as shown in the next Figure: | ||
| + | [[File:Eclipse_new_project4.jpg|thumb|center|Figure 6: New Helloworld project created.]] | ||
| + | <li> Modify the configuration file <code>conf.oil</code> by settings the following parameters: | ||
| + | <ul> | ||
| + | <li>The parameter <code>PLATFORM</code>defines the supported platform (default value is <code>JAILHOUSE</code>). In order to generate the bare-metal image set the parameter as follows: <code>PLATFORM = BARE</code>.</li> | ||
| + | <li>The parameter <code>INT_CONTROLLER</code>defines the supported interrupt controller and the values are <code>APIC</code> or <code>X2APIC</code> (default value is <code>X2APIC</code>). APIC ("Advanced Programmable Interrupt Controller") is the updated Intel standard for the older PIC. It is used in multiprocessor systems and is an integral part of all recent Intel (and compatible) processors. Its variant, referred to as X2APIC, is the most recent generation of the Intel's programmable interrupt controller and has been introduced with the Nehalem microarchitecture in November 2008.</li> | ||
| + | <li>In case of X2APIC mode, the parameter <code>X2APIC_MODE</code> defines whether the X2APIC is operating in the TSC deadline mode or not. The parameter is under the </code>INT_CONTROLLER = X2APIC>/code> parameter and the values are <code>TSC_DEADLINE</code> and <code>NO_TSC_DEADLINE</code> (default value is <code>TSC_DEADLINE</code>). | ||
| + | </ul> | ||
| + | <li> Click with the right mouse key on the project and select <code>Build project</code> as shown in the next Figure: | ||
| + | [[File:Eclipse_new_project5.jpg|thumb|center|Figure 7: Building the Helloworld project.]] | ||
| + | </ol> | ||
| + | |||
| + | The resulting elf file, contained in <code>$ECLISE_WORKSPACE/mytest/out</code> will be used to build the ERIKA3 bare-image as explained in the following section. | ||
| + | |||
| + | == Build the ERIKA3-image == | ||
| + | [todo] | ||
| + | |||
| + | |||
| + | Then, on the serial interface, you will see the two tasks printing alternatively on the serial interface, as shown in the next figure: | ||
| + | [[File:Helloworld_output.jpg|thumb|center|Figure 8: Output of the helloworld example.]] | ||
| + | |||
| + | |||
| + | |||
[[Category:Hypervisors]] | [[Category:Hypervisors]] | ||
Revision as of 14:57, 5 December 2018
This page spiecifies how to create a bare-metal ERIKA3 RTOS image for x86-64. The following image can be used for running on Qemu or with Xen/KVM hypervisor.
This tutorial explains how to setup RT_Druid environment to compile ERIKA3 RTOS application and how to create an ERIKA3 bare-metal image running a simple application.
Contents
Bare-metal compiler set-up
[todo]
RT-Druid set-up
In order to RT-Druid on the platform, download the RT-Druid package from the download section of the ERIKA3 website. Then, extract the downloaded archive. In the following part of the tutorial, we refer to directory containing the extracted RT-Druid archive as $RTDRUID_DIR.
Launch the RT-Druid application as follows:
 $ cd $RTDRUID_DIR
 $ ./eclipse
In order to enable the bare-metal compiler tool, set the Gnu compiler prefix property. RT-Druid allows to set these variables also from within Eclipse. Just press the right mouse button on the Eclipse project and select Properties as shown in the following figure.
Then, select Generator properties, enable project specific settings (as shown in the next figure), and set the desired value for the X86_64 property named Gnu compiler prefix.
Note that RT-Druid allows to set these variables for a single project by just pressing the right mouse button on the Eclipse project and selecting Properties).
Simple application
As ERIKA3 application we consider the simple "helloworld" application consisting of two tasks printing on the serial interface.
- Run the RT-Druid tool $ cd $RTDRUID_DIR $ ./eclipse
- Create a new project by clicking on
New→RT-Druid v3 Oil and C/C++ Projectas shown in the next Figure: - Name the new project (e.g.,
mytest) as shown in the next Figure: - Check the box for using an existing template and select
x86-64→Helloworld OSEK demoas shown in the next Figure: - Eclipse will then show the new project, and RT-Druid will generate the configuration files, as shown in the next Figure:
- Modify the configuration file
conf.oilby settings the following parameters:- The parameter
PLATFORMdefines the supported platform (default value isJAILHOUSE). In order to generate the bare-metal image set the parameter as follows:PLATFORM = BARE. - The parameter
INT_CONTROLLERdefines the supported interrupt controller and the values areAPICorX2APIC(default value isX2APIC). APIC ("Advanced Programmable Interrupt Controller") is the updated Intel standard for the older PIC. It is used in multiprocessor systems and is an integral part of all recent Intel (and compatible) processors. Its variant, referred to as X2APIC, is the most recent generation of the Intel's programmable interrupt controller and has been introduced with the Nehalem microarchitecture in November 2008. - In case of X2APIC mode, the parameter
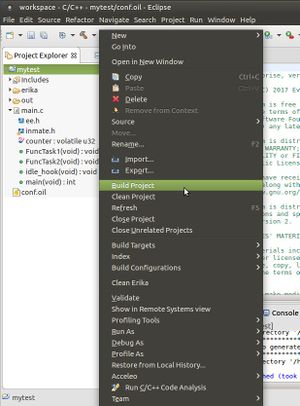
X2APIC_MODEdefines whether the X2APIC is operating in the TSC deadline mode or not. The parameter is under the </code>INT_CONTROLLER = X2APIC>/code> parameter and the values areTSC_DEADLINEandNO_TSC_DEADLINE(default value isTSC_DEADLINE). </ul> - Click with the right mouse key on the project and select
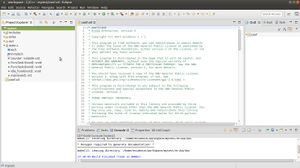
Build projectas shown in the next Figure:</ol>
The resulting elf file, contained in
$ECLISE_WORKSPACE/mytest/outwill be used to build the ERIKA3 bare-image as explained in the following section.Build the ERIKA3-image
[todo]
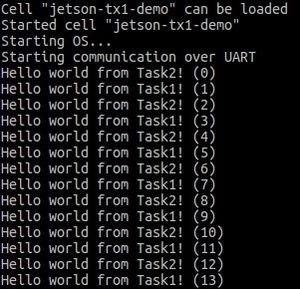
Then, on the serial interface, you will see the two tasks printing alternatively on the serial interface, as shown in the next figure:
- The parameter
