EtherCAT Master
Contents
Introduction
In the context of the I-MECH project, funded by the European Commission under the ECSEL programme, we have ported the SOEM EtherCAT library on ERIKA.
Such experimental support will be soon released in the next stable version of the RTOS.
This page explains how to setup and run the provided demo.
Requirements
For running the demo, an x86-64 platform with the following characteristics is needed:
- Supporting hardware-assisted virtualization (i.e. VT-x, VT-D, EPT) and capable of running the Xen hypervisor in HVM mode.
- With an Intel i210 network interface.
Demo
The provided demo assumes the Intel i210 network interface to be connected to a Beckhoff EL2004 EtherCAT slave. The demo has been tested on Advantech ARK-3520P-U7A1E.
To run the provided EtherCAT master demo, follow the next steps:
- Download the EtherCAT SOEM library for ERIKA3
- Download the bare-metal x86 toolchain available at this link http://erika-enterprise.com/download/erika3_x86_64_xtools.tar.gz and extract the downloaded archive on a local directory
- (optional) Put the directory containing the toolchain binaries in the
PATHenvironment variable before running RT-Druid. - Run the RT-Druid tool
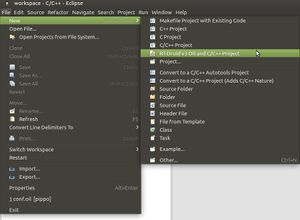
- Create a new project by clicking on
New→RT-Druid v3 Oil and C/C++ Projectas shown in the next Figure: - Name the new project (e.g.,
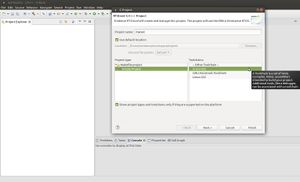
mytest) and select the Cross-GCC as shown in the next Figure: - Check the box for using an existing template and select
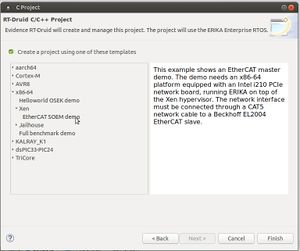
x86-64→Xen→EtherCAT SOEM demoas shown in the next Figure: - Right click the project and select
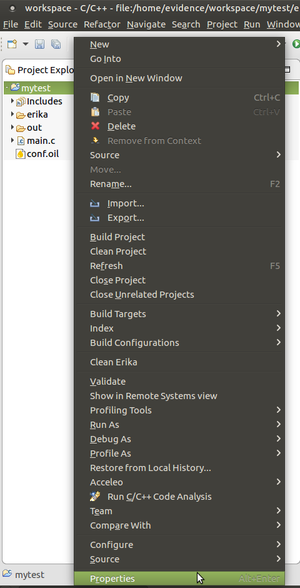
Propertiesas shown in the following Figure: - Click
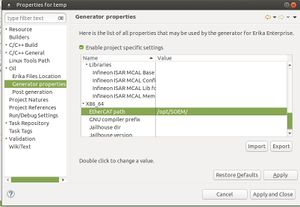
Oil→Generator properties, enable project specific settings and specify the directory containing the SOEM library for ERIKA3: - If you didn't put the toolchain in the
PATHdirectory, also set theGNU Compiler prefixproperty to/full/path/x-tools/x86_64-unknown-elf/bin/x86_64-unknown-elf-. - Edit the
main.cfile and set theSLAVE_NBvariable for the Bechkhoff EL2004 slave (note that the SOEM library numbers slaves starting from1). - Follow the instructions at this page for building and running the Xen iso image.
Motion control of CiA 402 compliant devices
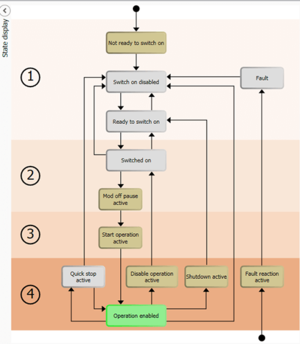
CiA® 402 refers to CAN in Automation (CiA) CANopen® Drives and Motion Control Profile 402, which standardizes the functional behavior of controllers for servo drives, frequency inverters, and stepper motors.
The profile describes the Finite State Automation (FSA) of the device, where each state specifies the internal/external behavior and the accepted commands:
The generic CanOpen specification for the automation provides an Object Dictionary, a grouping of objects accessible via the network in an ordered pre-defined fashion. Each object within the dictionary is addressed using a 16-bit index.
The CiA 402 extends the basic dictionary with specific objects and among these we can find Controlword and Statusword.
The Controlword is used to set the required states in the state machine. The Controlword bits are defined as follows:
| Bit | Name | Abbreviation |
|---|---|---|
| 0 | Switch On | SO |
| 1 | Enable Voltage | EV |
| 2 | Quick Stop | QS |
| 3 | Enable Operation | EO |
| 4-6 | Operation mode specific | OMS |
| 7 | Fault Reset | <F/td> |
| 8 | Halt | H |
| 9 | Operation Mode Specific | OMS |
| 10 | Reserved | R |
| 11-15 | Manufacturer specific | MS |
| Transition | Value (h) | BITS | |||||||
|---|---|---|---|---|---|---|---|---|---|
| 0 (SO) | 1 (EV) | 2 (QS) | 3 (EO) | 4-6 (OMS) | 7 (F) | 8-15 | |||
| 15 | Fault → Ready to switch on | 0x86 | 0 | 1 | 1 | 0 | xxx | 1 | xxxxxxxx |
8/9/0 | Non fault → Ready to switch on | 0x06 | 0 | 1 | 1 | 0 | xxx | 0 | xxxxxxxx |
| 3/5 | → Switched on(1) | 0x07 | 1 | 1 | 1 | 0 | xxx | 0 | xxxxxxxx |
| 4/4a | → Operation enabled | 0x0F/0x1F | 1 | 1 | 1 | 1 | xxx | 0 | xxxxxxxx |
